If you’ve ever found yourself with a large hole in your drywall, you know how frustrating it can be. Thankfully, there is a relatively simple way to patch it up and make your wall look good as new. In this blog post, we’ll show you how to do just that.
Materials Needed to Patch a Hole in Drywall
- Drywall saw
- Pencil
- Measuring tape
- Drywall (1/2 or 5/8 inch thickness)
- Level
- Utility knife
- Sandpaper (80 and 120 grit)
- Joint compound
- Putty knife (4 to 6-inch blade)
- Mesh tape (optional)
- Fiberglass tape (optional)
Preparing the Area Around the Hole
Before you can patch a hole in your drywall, you need to prepare the area around the hole. This involves cleaning up any loose debris and removing any damaged pieces of drywall. You also want to make sure that the area around the hole is free of dust and dirt.
To do this, start by using a vacuum cleaner with a brush attachment to remove any loose debris from the area around the hole. Next, use a utility knife to remove any damaged pieces of drywall from around the hole. Be careful not to damage the surrounding drywall as you do this.
Once you have removed all of the debris and damaged drywall, use a cloth or brush to remove any dust or dirt from around the hole. Once the area is clean, you are ready to patch the hole in your drywall.
Cutting the Drywall Patch
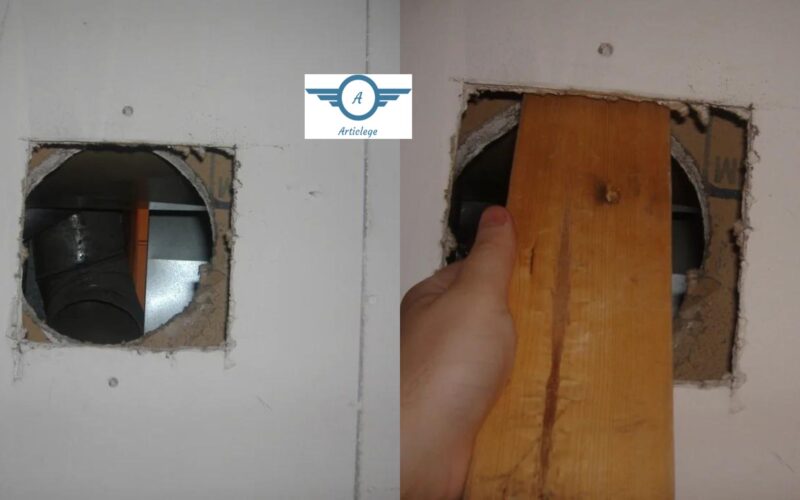
Use a drywall saw to cut out the damaged section of the drywall. Make the cut along the nearest stud on each side of the hole. If the hole is close to an edge, you may need to use a piece of blocking to support the patch.
Applying the Drywall Patch
Cut a square of drywall slightly larger than the hole you’re trying to patch. Place the drywall patch over the hole and trace around it with a pencil. Cut out the traced circle with a utility knife. Cut another circle inside the first one, creating a donut shape.
Score the back of the drywall patch with a utility knife. Snap off the inner circle, or “donut,” of drywall. Score the back of the drywall patch in the opposite direction from your first set of cuts. This will make it easier to bend the drywall patch and make it fit into the hole you’re trying to patch.
Apply construction adhesive to the back of the drywall patch and press it into place over the hole. Apply pressure to adhere it to both sides of the wall.
Securethedrywallpatchwithscrewsdrivenintothecenterofthepatchandspaced8inchesapartaroundtheedges, or use nails driven in along both sides at an angle.
Applying Joint Compound
Applying joint compound is a three-step process:
1. Prime the patch area by spreading a thin layer of joint compound over it with a wide putty knife. This will help the second layer of the joint compound to adhere more easily.
2. Spread a thick layer of joint compound over the primed area with a wide putty knife, making sure to extend the compound at least 2 inches beyond the edges of the hole.
3. Allow the joint compound to dry completely, then sand it smoothly with a fine-grit sandpaper.
Sanding the Joint Compound
To start, cut a square or rectangle around the hole that is about 2 inches wider and taller than the hole itself. Next, use a putty knife to scrape off any loose paint or debris from around the hole. If there is any old joint compound or tape on the edges of the hole, be sure to remove that as well.
Once you have a clean surface to work with, apply a layer of joint compound to the area around the hole, using your putty knife to spread it evenly. Then, take your piece of drywall tape and press it into the wet joint compound, covering the entire hole.
Now it’s time to sand the joint compound until it is smooth. You can use either a hand sander or an electric sander for this step. Start with coarse sandpaper and then move to finer grits until you have a smooth surface. Wipe away any dust with a damp rag before moving on to a painting or wallpapering.
Painting the Patched Area
Once the area is fully dry, you will want to paint the patched area. To do this, you will need to use a primer paint. This type of paint will help the new paint to stick to the wall and will also help to cover up any imperfections in the surface. Once you have applied the primer paint, you can then proceed to paint the area with your chosen color.
Tips for Patching Drywall
When it comes to repairing holes in your drywall, there are a few things you need to keep in mind. First, the size of the hole will determine the type of patch you need to use. If the hole is less than four inches in diameter, you can use a self-adhesive patch. If the hole is larger than four inches, you’ll need to use a piece of drywall that’s cut to size and then secured with drywall screws.
Once you’ve determined the type of patch you need, there are a few tips that will help you get a professional-looking result:
- Use a level when tracing the outline of your patch onto the drywall. This will ensure that your patch is even with the surrounding area.
- Cut out the traced area with a utility knife or drywall saw. Be sure to wear safety goggles when using either of these tools.
- If you’re using a self-adhesive patch, simply peel off the backing and place the patch over the hole. If you’re using a piece of drywall, secure it in place with drywall screws.
- Once your patch is in place, apply joint compound around the edges and over the surface of the patch. Use a putty knife or trowel to spread the joint compound as evenly as possible.
- Allow the joint compound to dry completely before sanding it down for a smooth finish.